Wednesday, September 21, 2016

Nailed It!!!

As teachers, there comes a time when we have to do what we have to do to grab our students' attention, right?

Sometimes, you try to point something out to your students and they just don't know what you're pointing at, whether it's on the document camera or during small group instruction. Other times, well, they just aren't looking.

Well, my wonderful friend Sandra, who is an amazing teacher, took it to the next level and she NAILED IT!!!

Check it out!!!


She had her nail tech paint an arrow on the nail of her pointer finger!  What an attention grabber!  I love it!

Here is another angle.  Isn't this creative?

I had to share this amazing idea with everyone.
This will definitely get students "pointed" in the right direction!!!

Thanks for letting me share it Sandra! And thanks for being such a great motivator to your students. They are so lucky to have you as their math teacher!!!

Monday, September 19, 2016

Figure Me out!

Not only is this great to use as a "getting to know you" activity, but it also allows students to review what they learned the previous year about computation and order of operations!

To be fair to my students, I created a Figure Me Out sheet of my own so they could have an example of what was expected.

I allowed my students to work with a partner so that they could discuss, share and remind each other about skills they learned last year. They were also able to use journal notes and resources that were glued into their math journal.


I did find out a whole lot about my students. They are very creative and their drawing skills are very impressive. 


I challenged my students to create a 2-step problem and use the order of operations.


It makes a great display for Meet the Teacher Night or Open House.


This activity also gave me a chance to show my students what I expect when they are working in pairs, with their shoulder partner. As I monitored the classroom, I praised students that were using the correct "volume" when discussing.  Since students learn by example, others took note of this and followed suit.

If you are interested in purchasing this activity, you can find it HERE.

Thanks so much for looking and have a great day!!!

Sunday, September 18, 2016

Meet the Teacher Night Idea

Just an idea for your "Meet the Teacher Night" or Open House.

I didn't receive many tissue boxes or sanitizing wipes at the beginning of the year, even though it was requested on the student supply list. Just so you know, these items are only requested for homeroom classes, NOT every teacher.

Anywho!  I came up with this idea very last minute.  I remembered I purchased small sticky notes shaped like a hand at Walmart over the summer, so I came up with this idea!


I wrote items my students needed in the classroom.

I also made a sign so parents could see what the sticky note was for.

Simple, yet effective!  As parents were waiting their turn by the door, they were able take a sticky note as a reminder to bring a box of tissue or canister of disinfecting wipes. I did mention that cold and flu season was right around the corner a few times. Of course it was their choice, and not every single parent took one, but hey, I'll take what I can get!

I have received a few boxes of tissue and only two canisters of disinfecting wipes, but it's only been a couple of days.  I'm hoping I'll get more this coming week. After all, some people do their shopping only on the weekends! (Optimism is your friend!) ;D

I still have quite a few hand shaped sticky notes left.  My original idea was to write down a positive comment or even something like "homework pass" and give them out as "high fives" to students as rewards. I will still be able to do that! The notes were inexpensive and several came in the pack.

I hope these tips were helpful to you! "Stick around" by following me!  I'll be adding more tips and ideas as the year passes.  ;)

I'd also LOVE to hear how you use sticky notes in your classroom!

Thanks for looking and have a great week!!!


Tuesday, August 23, 2016

Great Classroom Management Tip!

Imagine this--
You are conducting small group instruction and the rest of your class is working on another activity. Then, it happens. You hear from the other side of the room, "Miss! I need help!" or "Sir, can you come over here real quick?"  Well, you go on over and this is what they ask you, "Can we write on this paper?" or "Is this for a grade?" or maybe even "I forgot how to do this step. Can you show me?"  


It can seem like your a constantly back and forth and not much instruction is given to your small group.

Well, this happened a whole lot in my classroom years back. It felt like a tug of war.  But then I remember seeing something like this either in a book or online.  I wish I could remember, but it was a long time back.

Students are instructed to ask three other students their question before they can ask the teacher.  If no one knows the answer to their question, THEN they can ask the teacher. 

It prevents lots of unnecessary interruptions and as a teacher, you can get more accomplished during small group instruction.

I made this sign and have it posted at the front of my classroom as a reminder to students.

Yes, sometimes they forget. It wouldn't be normal if they wouldn't forget, would it?  LOL  So I just point to the sign and they remember to ask their partner or neighbor.

Here's my sign!


You can download the sign for free HERE.

I hope this is a helpful strategy and you can use it in your classroom!

Thanks for reading and have a wonderful day!!!

Monday, August 22, 2016

Quick and Easy Teacher Dry Erase Board!

I teach 7th grade math and I like to make it fun for my students. One of the methods I use in order to engage my students in learning is to have them write on their desks with dry erase markers. Students LOVE it and they participate more. 

My problem? The teacher table I use has a dark brown top, so when I write on it to show my students how to solve problems it's difficult for them to see what I am writing when I display it via projector onto the white screen in front of the room.

I came up with a solution for that!  All I needed was a large sheet of white paper and clear con-tact paper. Ta-da!!!! Problem solved!


First I taped the large sheet of white paper to my table. You can see the tape on the corner, but it doesn't show on the screen.


I then sandwiched the large white sheet of paper between the table top and the contact paper.  I will admit, it was easier to do with my husband helping me.  So, consider it a job for two people.  That way there will be no bubbles or creases.  One person peels off the backing a little at a time holding the con-tact paper at a 45 degree angle while the other person is smoothing it down from side to side.


And there you have it!  A white dry erase board that makes it easier for my students to see what I am writing when I display it via projector onto the screen in the front of the room!

The dry erase marker comes off with one swipe!  I already wrote on this one and erased.  Can you tell?

By the way, I used Con-Tact Clear Transparent Brand.  I haven't tried other brands, so I don't know how easy it is to clean the dry erase marker off of those.
Con-Tact Self-Adhesive Shelf Liner

I hope this helps anyone else that has this problem!!!

There might be other solutions some of you may use, however, this is the solution that worked for me. I just wanted to share!!  :D

Just to clarify, my students also have dark brown tabletops, but they don't have trouble with reading what they write with a dry erase marker.  It's only when I display my tabletop with a projector, it becomes difficult to see what I am writing.

Click HERE to see what I have my students use as erasers.

Thanks for reading and have a wonderful day!!!

Sunday, August 21, 2016

Ready for a New School Year!

Summer has come and gone and a new school year is upon us. I have been spending several hours preparing my classroom as many other fellow educators have been doing.  Organizing, arranging, throwing out, and putting in items to make it look and feel like a safe, suitable, comfortable learning environment for my incoming 7th graders. Let me give you a tour.


Here is the display space outside my room.  It's simple but with a great message. "Your attitude determines your direction.  Make it a good one!"  At the beginning of every class, students will line up in front of this area.


Welcome!  7th Math and a little motivational sign I created.


Here is a close up of the sign.
Just a reminder that it's truly all about them!


Am I the only one that thinks that this is the cleanest my desk will be all year?  BTW, notice the emoji taped to the corner of my computer.  It's a note to remind me that I have morning and afternoon duty all week, the first week of school.


Front view of my desk with my name on the pennants.  You think my students will actually call me this instead of "Miss" this year?


Side view of my area. You can see how I make my table skirt HERE.


"Cell Phone Parking" using a shoe organizer.  Because, when your two-period block class becomes a 45 minute class from one year to the next, "ain't nobody got time for that" phone!  Well, only when it's incorporated into the lesson.  ;)


I started this last year.  Both types of clocks, analog and digital, to help students practice telling time.  Yes, many seventh graders still do not know how to tell time on an analog clock.  I blame it on the digital era.  Underneath my clocks are "Ask Me!" badges.  Students that prove they have mastered a skill get to wear this and act as my "teaching assistants".  They love it!  They get to teach/help other students in the class and let's face it, sometimes students would rather ask a peer for help then ask the teacher for help.  It's a WIN, WIN!

Focus/Agenda board ready!  Love the cute pencil shaped dry erase board eraser.  Dollar tree item!

My closets actually closed!!  Just kidding.  There is still room in there.  Last door: I'm challenging my students to "change their mindset" this year.

Math Reminders! Because, sometimes they need a little reminding!  I adjust as needed throughout the year.

Journals go here. And they WILL be put away neatly.  They WILL I say!!!

F.Y.I. board.  The "Missing Parts" pocket in the lower left corner is a lost and found for station pieces. It's a life saver!!! Find more info on it HERE.


Group trash bins are upside down with the corresponding group tool kit.  Trash bins are great when students need to cut pieces from paper.  Just wad up scraps, place in trash bin and when it's time to put away, a designated student "takes out the trash".  It's easier than picking up papers from the floor.  Tool kit contains color pencils, glue, scissors, pencil sharpener, etc...you know, school tools.


That's all folks!!!

If you are interested in some of the motivational mini posters and pennants, you can find them in the links below.


If you are interested in anything else you saw, just contact me and I'll be happy to help you out!  :)

I hope this tour of my classroom was helpful!  Thanks for looking and I hope everyone truly has an amazing and productive year!!!

Wednesday, August 10, 2016

Makeshift Table Skirt for the Classroom


My creativity was shining today!!!  Well, I thought it was.

I DO NOT like this look. Wires everywhere and students can see what is in my storage unit, the one with the clear plastic drawers.  I also don't like the mess on top of the table, but that's a totally different story. I'm working on that one too.


Anywho, I remembered a while back when Dollar Tree first opened, they use to sell plastic adhesive table skirts, I used one years back to hide a similar type of mess when I was teaching 5th grade.  Well, guess what? They don't have them any more!!! NOOOOOOOOOOOOOOO!!!! (Your trying to figure out when Dollar Tree first opened, aren't you? STOP! It was in 1986.)

So I went to WalMart to see if they had any adhesive table skirts. Well, the answer was ""Nah, to the ah to the NO, NO, NO!" However, in the party section, they did have plastic table covers for $0.97. So I grabbed a couple of teal colored ones to match my theme for this year.
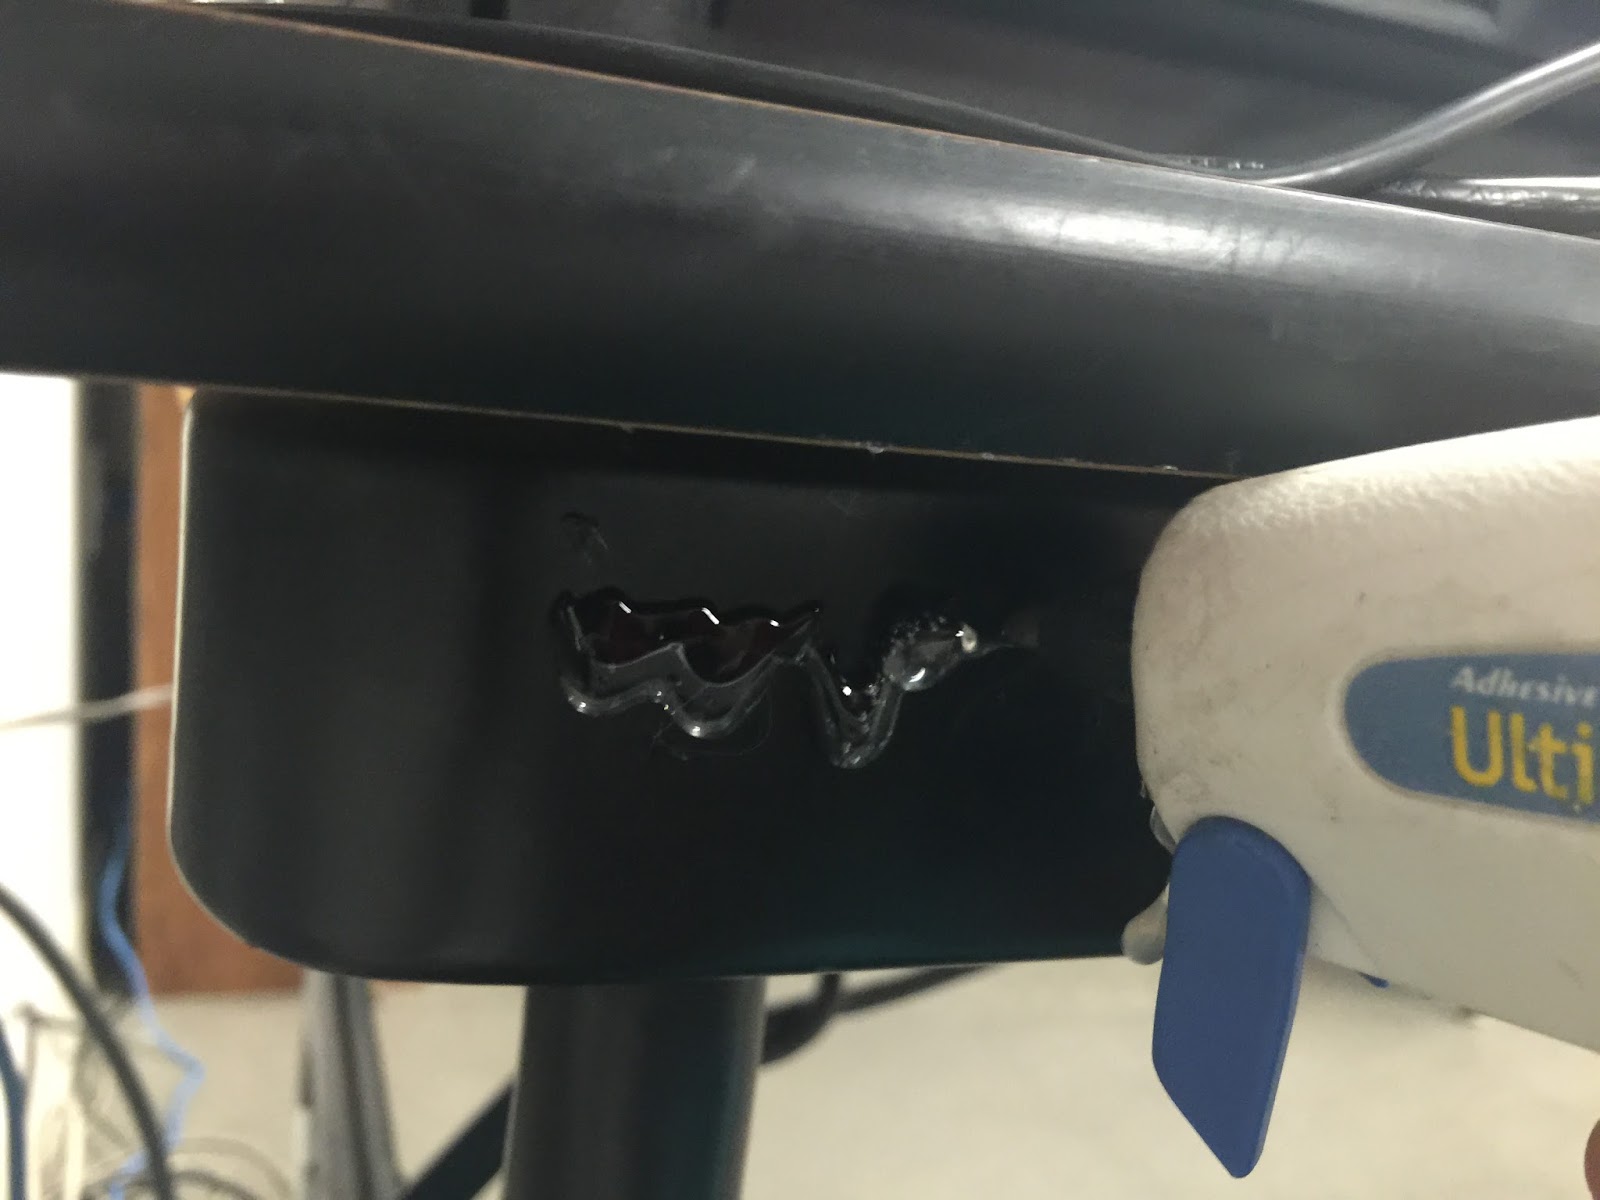
So I'm looking at my messy table trying to figure out how I can make this table cover into a table skirt and then it dawns on me! The edge of the table is metal!!!  I can use hot glue!! Hot glue will peel off metal and not damage it!  Well, that's what I was thinking. So I rushed home and grabbed my trusty ole' hot glue gun and glue sticks and tried it.

It peeled right off! The hot glue, after it cooled, peeled right off!  YAAAASSS!!!!
So here is what I did next.
Apply glue.

Pinch plastic, but do it carefully!!! The glue is very hot!!!!
Press it down further with an old pencil so that you don't burn yourself.  I'm not gonna lie.  It would have probably been easier if someone was helping me.  But I glued small sections at a time and it was pretty easy.  Don't  put glue on large sections because it will cool fast and the skirt won't stick.

I had to carefully go around the wires to the E.L.M.O. so I left a small area that was not glued down.  Just in case I had to remove the cords for some reason.


I know it seems a little messy, but I'm snapping pics up close to the edge of the table.  Be patient. The final picture is coming up!

 I have to give you a few more details.


First of all, when you take the table skirt out of the package DO NOT unfold the entire thing. Unfold it up to the point that it is still folded in half.


The folded edge is what I glue to the metal part of the table.

Well.  Here it is!  I think it looks great! I'm still trying to decide if I should add a border to cover the top section. Tell me what you think!


SUGGESTIONS:  If you decide try this, first apply hot glue to a small section of the table in an area that is hidden or can't be seen.  Wait for it to cool, then try peeling it off. I highly recommend that you do this first to test and see if it will work on your table.

Another option is adhering painter's tape to the section of the table you plan to glue the skirt onto. When applying glue and plastic table cover, do it only on the painter's tape.  

I hope this idea is helpful!  Thanks for looking!!!  If you do try it, I'd love to see the outcome!!