Sunday, July 31, 2016

Follow your own path!

Decorate your classroom with these arrow inspired labels and posters! The soft colors will be a great accent to any classroom.

I've also included some blank cards so that you can create your own labels and posters.  

Check out the preview below!

For more info, click HERE.


Thanks for looking and remember to Aim High and Reach for the Stars!!!


Wednesday, July 20, 2016

STAAR Test Griddables

UPDATE: I now have these available for the North Carolina EOG for grades 5 through 8! Links found at the end of this post.

Need one for your state? Just contact me!!!
I might be able to create it! 😉


I know! I know!  It seems too early to talk about state testing, but I wanted to share this idea with everyone as they prep for the upcoming school year.  This is a great activity to use at least once a week so students will remember how to fill in those griddable items on the test! Besides, students LOVE using dry erase markers so you should get some pretty good student engagement with these.


Just print your grade level's griddable on one side then laminate. Voila!  You have a two-sided dry erase board! I recommend using cardstock since it's sturdier. I teach 7th grade, so I am using the griddable for 6 - 8 as an example in the pictures.

Front
Back


If you don't have access to a laminating machine, just use page protectors.  I recommend sealing the open end with packing tape or colorful duck tape so that students won't be tempted to write on the page inside and ruin it. I also recommend that you use glossy page protectors so that the dry erase marker will wipe off easily.

Front
Back


These can be used to review and practice basic skills at the beginning of the year. Addition, subtraction, multiplication, division and rounding are skills students tend to forget certain steps to over summer break. These dry erase boards will motivate them to participate more than a worksheet will when you review these skills.  They can also be used throughout the year with other skills your students will be learning.

How do I use them?  
I present students with a problem via projector/screen.  Then I have them write it down and solve on their "dry erase board", all white side.  After they solve, I have them fill in the griddable on the printed sided and have them hide their answer from other students.  I then give them a cue, such as "On the count of three." or "Ready? Set? Show!", they then all hold up their answer shown on the griddable side.  I can then look and see who needs a one-on-one for filling in the griddable, as well as who needs more practice on the type of problem given.
This is also a great opportunity for immediate feedback!
Students love to here that they are correct.

Sometimes before the cue, I have shoulder partners compare answers and decide whether they agree or disagree with each other.  This presents a teachable moment between students.

They are very durable, either laminated or used in a page protector. I've had my class set for quite some time now, three years or so.

If you're interested in using this in your classroom, click on the appropriate link below to find them at my Teachers Pay Teachers store.

Texas STAAR Test Griddable

South Carolina EOG Gridded Response

Thanks so much for looking and I hope this is helpful to you and your students!


Tuesday, July 19, 2016

Numbers in My World Activity

It's almost back to school time!  If you're a math teacher, you get see how some students react to math during the first day of school. Sometimes it's not so great.  This quick "getting to know you" activity will help them realize that numbers are actually everywhere, even in their own personal world. Numbers are everywhere!


You can also have students color or decorate the page and display them for "Meet the Teacher Night" or "Open House".


You can find this activity HERE.

Thanks for looking and be sure to check back for more activities and ideas!!!

Thursday, July 14, 2016

Polish Remover in the Classroom?

So, on a recent trip to Dollar Tree, I found this large seven day pill organizer.  Almost immediately, I thought it could be used to store small math manipulatives.  So I brought one home and this is what I did.


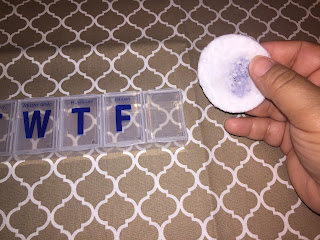
First, I took out my bottle of acetone and a couple of cotton pads.


With just a little acetone on the cotton pad, I was able to wipe off the letters on the pill organizer.

There was no damage done to the plastic container.


I ended up only needing one cotton pad to take all of the print off of the container with only one application of acetone.  You really don't need much.  

I know there are several brands out there, but I just wanted to show you the one I used.  I don't know if regular nail polish remover will work, but it's worth a try!


I'm actually at home right now and don't have many math manipulative with me.  But this picture gives you an idea of the items that can be stored in this nifty little container.

I'm thinking one per group in my class.  That way, each group will have items needed for stations easily accessible to them.

Let me know what you think!  If you have any other ideas these can be used for, please feel free to share in the comments. It might help someone else out.

For example, I also create jewelry.  I'm thinking these would be great to store some of my beads or other jewelry findings in.

Thanks for looking!

Tuesday, July 12, 2016

Change it up a little with this dice game!

At the beginning of each school year, I find it helps students to do activities that will review skills that I know they didn't practice during the summer. 

This is an easy activity to prep and use to review computation of three digit numbers, as well as place value.


All you need are 7 number cubes (a.k.a. dice), label stickers and a marker.  Actually, you can use as many number cubes as you wish. 
I only had these circle stickers available, but they were larger than the sides of the cubes, so all I did was cut them into the squares. 


You will only need six stickers per cube.


For this set, I only used addition and multiplication.  But you can change it up depending on the grade level.  Just keep in mind that if you use subtraction, some answers will be negative.  If you use division, instruct students to create a fraction/mixed number or decimal as the answer.  Rounding might be necessary for the latter.

I placed a multiplication sign and addition sign opposite to each other.  In other words, "X" on top and "+" on bottom.


This is what they ended up looking like when I was done.  The stickers held on pretty good, so I'm not really worried about them popping off. If they do, I'll probably just cover with clear tape.


So, here are the directions to the game.  Again, depending on grade level, you can make this anywhere from a 2-digit by 1-digit game to a 4-digit by 2-digit game.  It just depends on students and what they need to practice.

This is a two to four player game. There are three sets to roll per round.  The first roll creates the first number in the problem. The second roll determines the operation (x or +). The third roll determines the second number in the problem.


In this pic, you can see the first roll came up with a 1, 5 and 3.  The second roll came up as "x", and the third roll came up with a 6, 4, and 4.

Here is where the place value comes in. Have students discuss the largest possible number they can create with what they rolled.  In this case, the first number is 532 and the second is 644.  Now students just multiply the two together.

This can become a self checking activity simply by assigning a calculator and having each player take turns checking the answer to see who did it correctly.  This provides immediate feedback for students that might have erred in their calculations.

I hope this was helpful! If you have any other ideas to add using this activity, please leave them in the comments below.

Thanks for looking!!!

Monday, July 11, 2016

Playing Card Storage for the Classroom

Lucky me!! I found these at WalMart for 14 cents!
How could I say no?
In a previous post, I shared an activity where students could practice integer fluency with a regular deck of playing cards.  
You can find that activity HERE.

Well, now I have the perfect storage for those cards!

I love to use playing cards to practice math skills in my classroom, but the boxes they come in are not very durable.  These index card boxes are the perfect size for them.


I first removed all of the items inside the box.  I kept what I might use later and threw away what I didn't need.Many of you might already know what it is like to have a classroom full of students using different sets of playing cards. Someone is going to drop a card, or two, or three on the floor.  It isn't very much fun trying to figure out what set they belong to. So I organize them this way.

I organize each set by letters.  And I write the corresponding letter on the storage box.


I use permanent markers to write the letters on the cards and on the box.

Now if a student finds a card on the floor, they know immediately which set to return it to.

I have used this method for a few years now and it works really well for me.

Let's face it, nothing lasts forever. These cards might only last one or two years. But the learning that took place using them is very valuable!

Quick Tip:  I actually found these index storage boxes in the clearance aisle about a month after school started.  You know how stores are, they clear out the back to school items to make room for the fall holiday items.  So keep an eye out for them!  They are great for storing other card activities that you might use in your classroom!  You might even be able to store crayons in them!

One more thing!  I used letters, but you could use numbers, shapes, patterns or even just a line across the back of the card using different colors of markers. Use whatever works best for you!

I wouldn't use stickers though. Those would definitely come off quickly.

I hope this was helpful!  If you have a different way of organizing and storing your cards that might be helpful to other teachers, please feel free to share in the comments!

Thanks for looking and have a wonderful day!!!!