Showing posts with label math activities. Show all posts

Saturday, January 28, 2017

Pass Around Activities for the Math Class

I believe that providing opportunities for your students to discuss solutions to problems in math class is a must! They can learn from each other and teach each other. Let's face it, the reality is that some of our students will not always learn only from the teacher. We can show them 100 problems for the same skill or till we are blue in the face, sometimes they just need to hear it explained by their peers.

One of the activities I use in my classroom is called a "Pass Around".  There are many advantages to this activity. One is that you only need as many problems as you have groups. For example, my largest class is broken up into six groups, so I only need six problems when I use this activity. My smallest class is broken up into four groups, so I will remove problems five and six for that class.

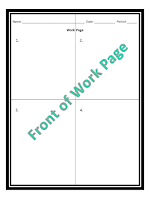
Students are each required to show their work on their own paper, so everyone in the classroom needs their own work page. I will admit that when I first introduce this activity, some students try to get away with having only one work page for their group which leads to only one student doing all of the work. That is what we DON'T want to happen. So just look out for that. After doing this a couple of times, they get the idea. 

I then have them fold their work page in fourths and number the front 1, 2, 3, 4 and the back 5 and 6. This will change if you have a different number of groups in your class. If you have only five groups, you will have them number from 1 thru 5 and so on. The number of groups will correspond to the number of problems you will use. By the way, I have my students in groups of four. You can see how I set them up HERE.
     

The reason I have them fold their paper like this is because even at the 7th grade level, some students still write their work ALL OVER  the place on their paper. Some students do not organize their work neatly on their paper. This is even after I tell them to set it up like we did in our notes! Ah yes, the teenage mind. This technique will at least "contain" their work for each problem in a designated section of the paper. It makes it so much easier for me when I grade their work.

I also have them decide who will have the job of "problem number monitor" for their group. Their job will be to remind the group what problem number they are on and what section of their work page to show their work on. This is because all groups will be working on different problems as the problems will be rotating around the room.

I then set the timer according to the types of problems that are being solved. The first round always takes a little longer. I think it's because of the discussion and teaching that is taking place. I give them a minute or two less for the rest of the rounds. For example, if the problems are on order of operations, they might just need four minute rounds. But if the problems are about determining a missing dimension in similar figures, they might need six minutes. The number of steps will determine the time you give.

To begin the activity, I tell the class how much time they will have for their group to find the solution to the problem they start out with. I use timers from http://www.online-stopwatch.com/.  They have colorful and fun timers that you can display. Displaying the time really keeps the students on task.


When time is up, students remain seated in their groups and "Pass Around" their problem. I have students rotate their problems clockwise or counterclockwise around the groups in the classroom. But you must keep going the same direction for the entire activity so that they keep receiving different problems. Eventually, they will complete the set of problems.


Some classes will complete all of the problems and some won't. I'm okay with that! That's because the discussions that take place, the amount of peer tutoring that will occur, and the amount of learning that will be achieved will make up for it. You will see it happen as you monitor the classroom during the activity. You can also do some one-on-one teaching and small group instruction. You will encounter "that group" that you will need to remind to stay on task, but that is nothing new in our career. :)

The best part? I didn't need to make copies of a worksheet for every student! I only needed one worksheet to cut up and write problem numbers on.

Here are more suggestions on preparing a "Pass Around" activity for your classroom.
  • Instead of just cutting up a worksheet, type up the problems and print them out on colorful card stock.
  • Laminate for durability.
  • Students can use dry erase markers on laminated cards to underline or circle important information.
  • Add clip art related to word problems to help students understand what the problem is about.
  • Print the problem so that you can fold the page in "tent" form so that all students in the group can see the problem better. Check out the pictures below. 
Same problem at the top and bottom
but opposite orientations.
Students in the group can see and read
the problem from the front...
...and the back when folded in half
to create a "tent".
  

 I hope you will try this activity out in your classroom. It will work for any subject and grade level. You can use it as a test review, guided practice, or for an enrichment class. I know it makes a difference in my classroom, I'm sure it will in your classroom too! ;)

If you have any questions, please don't hesitate to ask! I'll help with what I can.  Thanks for reading and have a wonderful day!!!

Saturday, November 5, 2016

Loop Game in Action!

What is a Loop Game?

It's a great way to get your students to become engaged in learning, to discuss and explain how to solve problems and to have students peer tutor other students.

Let's face it, some students can find worksheets boring. Loop Games will definitely break up the monotony that sometimes occurs in the classroom due to daily worksheets.

They can be used in a variety of ways from test reviews to having students practice skills while you work small group.

It's easy to monitor the class because students are walking around solving problems and having discussions while you facilitate learning.

I usually put students in groups of two to three, depending on the class size. I also make a reduced copy (print 2 to 4 pages on one sheet) of the Loop Game to use as an answer key so that it's easier check students' progress throughout the game as I am monitoring.

Here are some of my students in action during a Loop Game.


Notice the white pages with the blue border that are taped to the wall in each picture? This is how I set up my Loop Games. Students start at one of the problems, show all of their work on a sheet of paper and when they find the answer, they then look for the next card that has the answer they found at the top of the card.

For example, in the picture shown below students would ignore the 2 at the top of the first card because that's the answer to a problem on another card. They would solve the problem 5 x (63 ÷ 7) + 7. and then look for the answer at the top of another card in the room. In this case the answer is 52. Students would then solve (36 ÷ 6 x 5) - 20 and look for that answer at the top of another card in the room. In this case, the answer is 10.


Students then continue to do this until they locate the answer to the last problem at the top of the card they originally started at. Hence the name "Loop Game". Now, if they end up on the card they started at but did not solve all of the problems on the cards, that should tell them that they solved a problem incorrectly. To get them back in the game, I tell them which card they erred on to avoid frustration on their part.

Something I forgot to mention is that when I set the game up on the wall I make sure I mix up all of the cards so that the problems won't be in order. That way students won't expect their answer to be on the next card. I also have students start at different cards to avoid crowded areas. It's easier to monitor students when they are spread around the room.

Sometimes, I stand at the center of the room and listen to the conversations going on. I can say that I have smiled quite a bit! Mostly when I hear a student explaining to another student how the problem should be solved.

The best is when students in the same group rush over to me and show me their answers and they happen to be different. They ask, "Miss, who is right?". Well, I answer a question with a question of course and ask each to explain the steps. As they are explaining, that's when it dawns on the one with the wrong answer what he or she should've done to get the correct answer. Then it happens. The student with the correct answer yells, "I told you! I told you I was right!". I love the confidence in their voice.

Students rushing over to the teacher because they want to prove that they are correct! Imagine that. How often does that happen? LOL

I hope this information is helpful and that you try this activity in your classroom!

Here's a Loop Game you can try for FREE with your students!
Just click HERE.

Be sure to try out some of my other Loop Games at my TPT Store.

https://www.teacherspayteachers.com/Store/Math-Imagination

If you are interested in a Loop Game for a particular math skill, just contact me! I'll create it and post it on my Teachers Pay Teachers store.

Thanks for reading and have a wonderful day!!!

Monday, June 20, 2016

Stations From Store Ads? YEEEESSSS!!!!!!

Some people call them "store ads", others call them "store circulars".  I call them "STATIONS"!!!!

All you need are "store ads", scissors, glue, index cards and your imagination!
Here is a set I made to use as a station in my math class.


I wrote the answers on adhesive labels and stuck them on the backs of the cards to make the station self-checking! I use adhesive labels, because sometimes the writing will go through the card and students can see the answer.


Here is a closer look at the directions I provided to give you an idea. I like to include skills covered.


I am attaching pictures of some of the cards below to give you ideas for the types of questions you can create for your station.


I hope this idea inspires you. You can create problems for many types of skills, including Financial Literacy standards! I'm listing some more ideas below to help.
  • How much money will you get back if you pay with a $20 bill?
  • What is this amount rounded to the nearest dollar?
  • How many can you buy if you only have $10? (tax not included)
  • If sales tax is 8.25%, how much will your total cost be?
  • For sales such as "3 for $5", you can ask this question: How much will you pay for eight?"
The possibilities are endless and it will cost pennies to create! In addition, you are using real life situations and the ads are colorful.

Take it to the next level! Have your students create a card, independently, with a partner, or in a group.  Have them include the answer. Not only can you use this as an evaluation, but you just had your whole class create another station.  They will love seeing their own creations!


Here are more activities that involve percents and money from my Teachers Pay Teachers Store.


Hope this helps!