One of the activities I use in my classroom is called a "Pass Around". There are many advantages to this activity. One is that you only need as many problems as you have groups. For example, my largest class is broken up into six groups, so I only need six problems when I use this activity. My smallest class is broken up into four groups, so I will remove problems five and six for that class.
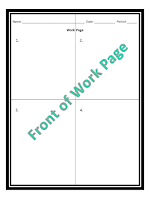
Students are each required to show their work on their own paper, so everyone in the classroom needs their own work page. I will admit that when I first introduce this activity, some students try to get away with having only one work page for their group which leads to only one student doing all of the work. That is what we DON'T want to happen. So just look out for that. After doing this a couple of times, they get the idea.
I then have them fold their work page in fourths and number the front 1, 2, 3, 4 and the back 5 and 6. This will change if you have a different number of groups in your class. If you have only five groups, you will have them number from 1 thru 5 and so on. The number of groups will correspond to the number of problems you will use. By the way, I have my students in groups of four. You can see how I set them up HERE.
The reason I have them fold their paper like this is because even at the 7th grade level, some students still write their work ALL OVER the place on their paper. Some students do not organize their work neatly on their paper. This is even after I tell them to set it up like we did in our notes! Ah yes, the teenage mind. This technique will at least "contain" their work for each problem in a designated section of the paper. It makes it so much easier for me when I grade their work.
I also have them decide who will have the job of "problem number monitor" for their group. Their job will be to remind the group what problem number they are on and what section of their work page to show their work on. This is because all groups will be working on different problems as the problems will be rotating around the room.
I then set the timer according to the types of problems that are being solved. The first round always takes a little longer. I think it's because of the discussion and teaching that is taking place. I give them a minute or two less for the rest of the rounds. For example, if the problems are on order of operations, they might just need four minute rounds. But if the problems are about determining a missing dimension in similar figures, they might need six minutes. The number of steps will determine the time you give.
To begin the activity, I tell the class how much time they will have for their group to find the solution to the problem they start out with. I use timers from http://www.online-stopwatch.com/. They have colorful and fun timers that you can display. Displaying the time really keeps the students on task.
When time is up, students remain seated in their groups and "Pass Around" their problem. I have students rotate their problems clockwise or counterclockwise around the groups in the classroom. But you must keep going the same direction for the entire activity so that they keep receiving different problems. Eventually, they will complete the set of problems.
Some classes will complete all of the problems and some won't. I'm okay with that! That's because the discussions that take place, the amount of peer tutoring that will occur, and the amount of learning that will be achieved will make up for it. You will see it happen as you monitor the classroom during the activity. You can also do some one-on-one teaching and small group instruction. You will encounter "that group" that you will need to remind to stay on task, but that is nothing new in our career. :)
The best part? I didn't need to make copies of a worksheet for every student! I only needed one worksheet to cut up and write problem numbers on.
Here are more suggestions on preparing a "Pass Around" activity for your classroom.
- Instead of just cutting up a worksheet, type up the problems and print them out on colorful card stock.
- Laminate for durability.
- Students can use dry erase markers on laminated cards to underline or circle important information.
- Add clip art related to word problems to help students understand what the problem is about.
- Print the problem so that you can fold the page in "tent" form so that all students in the group can see the problem better. Check out the pictures below.
 |
| Same problem at the top and bottom but opposite orientations. |
 |
| Students in the group can see and read the problem from the front... |
 |
| ...and the back when folded in half to create a "tent". |
I hope you will try this activity out in your classroom. It will work for any subject and grade level. You can use it as a test review, guided practice, or for an enrichment class. I know it makes a difference in my classroom, I'm sure it will in your classroom too! ;)
If you have any questions, please don't hesitate to ask! I'll help with what I can. Thanks for reading and have a wonderful day!!!


No comments:
Post a Comment